Tips and tricks to enhance your Power Automate development experience

1. Using flow templates:

Flow templates in Microsoft Power Automate are prebuilt or custom templates that allow you to automate tasks or processes between connectors. Here’s how you can use flow templates:
Browse and Explore Templates:
- Visit the Microsoft Power Automate Templates page.
- You’ll find a wide range of templates categorized by use case, such as remote work, approval workflows, data collection, email automation, and more.
- Explore the templates to discover what’s possible and find one that suits your needs.
Benefits of Flow Templates:
- Time-Saving: Templates provide a head start by offering preconfigured actions.
- Best Practices: Templates often follow best practices for specific scenarios.
- Community Contributions: By submitting your own templates, you contribute to the Power Automate community.
Remember to explore templates and leverage them to streamline your flow development!
2. Skip trigger:

When you’re faced with uncertainty about which flow to begin with, the “Skip” button becomes your ally. Here’s why it’s beneficial:
Exploration Opportunity:
- By clicking “Skip,” you open the door to exploration.
- Instead of committing to a specific trigger immediately, you get to explore other options.
Tailored Selection:
- The “Skip” button lets you search for the precise trigger that aligns with your unique requirements.
- It ensures that you choose the right starting point for your flow.
Reduced Pressure:
- No need to stress over initial decisions.
- Take your time, explore, and find the trigger that best suits your scenario.
3. Name your flow:
In the flow name, remember to choose a descriptive name that reflects the purpose of your flow. Clear naming conventions improve readability and maintainability.
- When you give your flow a descriptive name, it becomes easier to understand its purpose and functionality.
- Clear naming conventions help you and your team quickly identify specific flows in your collection.
- A well-chosen name acts as documentation. It provides context without needing to delve into the flow’s details.
- When you revisit or maintain your flows, meaningful names reduce confusion and streamline updates.
- You can use the flow’s name dynamically within the flow itself.
- For example, if you want to include the flow’s name in notifications or messages, you can reference it using expressions.
- When you search for flows in Power Automate, the flow names play a crucial role.
- A descriptive name ensures that you find the right flow quickly.


Trigger conditions is a powerful feature that allows you to specify particular conditions that must be met before an automated flow can run or trigger. Here’s how it works:
Purpose of Trigger Conditions:
- Trigger conditions determine when a workflow (flow) will be initiated.
- They act as filters, controlling when your flow starts based on specific criteria.
How Trigger Conditions Work:
- Think of trigger conditions as expressions that evaluate to either TRUE or FALSE.
- You provide a function name and parameters to determine the outcome.
- For example, consider a SharePoint list with a field called
RunAutomation(a Yes/No field). You want the automation to run only if this field is set to YES. - The expression to test this condition would be:
@equals(triggerBody()?['RunAutomation'], true)
Testing and Validation:
- To ensure your expression works as expected, follow these steps:
- Create an Initialize variable action beneath the trigger.
- Set the variable type to Boolean.
- Test your condition both ways (e.g., trigger with
RunAutomationset to Yes and then to No). - Confirm that your expression yields the desired result.
- To ensure your expression works as expected, follow these steps:
Benefits of Trigger Conditions:
- Efficiency: They prevent unnecessary flow runs when conditions aren’t met.
- Clarity: Clear conditions improve flow readability and maintenance.
- Dynamic Usage: You can reference the flow’s name dynamically within the flow itself.
Remember, trigger conditions enhance the precision and control of your Power Automate flows!
6. Limit Recurrence Frequency:
In Microsoft Power Automate, the Recurrence Trigger allows you to schedule flows to run at specific intervals. Here are the details:
Setting Up Recurrence:
- To create a recurring flow, sign in to Power Automate.
- Go to My flows > New flow > Scheduled cloud flow.
- Specify the starting date and time for your flow.
- Choose the desired recurrence frequency (e.g., daily, hourly, or minutely).
Advanced Options:
- You can configure advanced options for recurrence:
- Time Zone: Specify whether the start time reflects local time zone, Coordinated Universal Time (UTC), or another time zone.
- Start Time: Enter the start time in the format
YYYY-MM-DDTHH:MM:SSZ. - Hourly or Weekly Scheduling:
- If you choose Day, select the time of day when the flow should run.
- If you choose Week, specify the days of the week and their corresponding run times.
- For example, you can start a flow no sooner than 3:00 PM (Pacific time) on Thursdays and run it every two weeks on Tuesdays at 5:30 PM (Pacific time).
- You can configure advanced options for recurrence:
Use Cases:
- Recurrence is handy for tasks like sending daily reports, performing regular data updates, or triggering actions at specific intervals.
- Keep in mind that the maximum flow frequency varies based on your licensing:
- User-based or App-based plans: 1 minute.
- Free plan: 15 minutes.
Remember to explore the possibilities of recurrence triggers in Power Automate to automate your recurring tasks efficiently!
7. Rename your actions:
Renaming your actions in Microsoft Power Automate is crucial for maintaining clarity, readability, and efficient flow development. Here are some best practices for naming your actions:
Descriptive and Concise Names:
- Choose names that clearly convey the purpose of each action.
- Be concise but descriptive. Avoid generic names like “Action1” or “Step2.”
Start with a Verb:
- Begin action names with an action word (verb) to indicate what the action does.
- For example, use names like “Create Item,” “Send Email,” or “Update Record.”
Include Context:
- Add context to the action name. Mention the entity, system, or data it interacts with.
- For instance, “Create SharePoint List Item” or “Update Salesforce Contact.”
Use Proper Case:
- Capitalize the first letter of each word in the action name.
- Proper case improves readability and consistency.
Avoid Abbreviations:
- While brevity is essential, avoid excessive abbreviations.
- Prioritize clarity over brevity.
Auto-Documentation:
- Well-named actions serve as self-documentation.
- Future you (or your team) will appreciate clear names when revisiting flows.
Consider Flow Relationships:
- If your flow consists of related actions, prefix them with a common group name.
- For example, “HR_Onboarding_CreateUser” or “Finance_ExpenseApproval.”
Trigger Names:
- Unfortunately, not all triggers allow renaming, but when possible, give them meaningful names.
- Triggers often define the flow’s starting point, so clarity matters.

Adding a note to your actions is a valuable practice for better organization and understanding within your flows. Here’s how you can do it:
Open the Flow in Edit Mode:
- First, open the flow you want to work on in edit mode. You can do this by selecting the flow and clicking the Edit button.
Add a Note to an Action Step:
- Once you’re in edit mode, locate the specific action step where you want to add a note.
- Click on the three dots (ellipsis) next to that action to open the options menu.
- Choose Add Note from the menu.
- The action step will expand, and a note section will appear.
- Enter your short note or comment in the provided field.
- After adding the note, you can exit the action step.
Remember, these notes serve as self-documentation and help you and your team understand the purpose and context of each action step.
9. Download a Run History:


You can download the run history of your flows to analyze execution details and troubleshoot any issues. Here’s how:
Access Run History:
- Open your flow in Power Automate.
- Navigate to the Run History section.
- Click on See all to view the complete history of flow runs.
Download CSV:
- Within the run history, select the Download CSV option.
- You can choose to filter the data before downloading. For instance, you might want to focus on failed runs or specific time periods.
- Keep in mind that retrieving the CSV may take a few minutes, especially if there’s a large amount of data.
This downloaded CSV provides valuable insights into when flows ran, their outcomes, and any associated inputs and outputs. It’s a useful tool for monitoring and analyzing your Power Automate flows!
10. Formatting Date and Times:
When working with date and time values in Microsoft Power Automate, you might encounter situations where the default format isn’t what you need. Fortunately, you can customize and format date and time values using the formatDateTime() function. Let’s dive into the details:
The
formatDateTime()Function:- The
formatDateTime()function allows you to manipulate and format date and time values in various display formats. - It’s especially useful for handling data across different time zones.
- The
Parameters:
- The function takes two parameters:
- Timestamp: This is the date and time value you want to format. It can be a manual string or dynamic content. If entered manually, the timestamp should follow the ISO 8601 format (
"yyyy-MM-ddTHH:mm:ssZ"). - Format string: This specifies the desired output format for the date and time.
- You can use either a standard format string or a custom format string.
- Timestamp: This is the date and time value you want to format. It can be a manual string or dynamic content. If entered manually, the timestamp should follow the ISO 8601 format (
- The function takes two parameters:
Standard Format Strings:
- Standard format strings use a single character (e.g.,
d,g, orG) as the format specifier. - Examples:
"g"corresponds to the General date/time pattern (short time):formatDateTime('2009-06-15T13:45:30', 'g')returns “6/15/2009 1:45 PM.”"D"corresponds to the Long date pattern:formatDateTime('2009-06-15T13:45:30', 'D')returns “Monday, June 15, 2009.”
- Standard format strings use a single character (e.g.,
Custom Format Strings:
- Custom format strings are longer and allow precise control over the visibility, positioning, and precision of date and time components.
- Examples:
"M/dd/yyyy h:mm tt"represents the same pattern as the standard format string"g":formatDateTime('2009-06-15T13:45:30', 'M/dd/yyyy h:mm tt')returns “6/15/2009 1:45 PM.”"HH:mm:ss tt"returns the 24-hour format:formatDateTime('2009-06-15T13:45:30', 'HH:mm:ss tt')returns “13:45:30 PM.”"hh:mm:ss tt"returns the 12-hour format:formatDateTime('2009-06-15T13:45:30', 'yyyy/MM/dd hh:mm:ss tt')returns “2009/06/15 1:45:30 PM.”
Dynamic Usage:
- You can use
utcNow()as the timestamp to automatically fetch the current date and time in UTC. - Example:
formatDateTime(utcNow(), 'MMMM dd, yyyy, HH:mm')returns the current date and time in the format “June 15, 2009, 16:50.”
- You can use
Remember, mastering formatDateTime() empowers you to tailor date and time representations to your specific needs!

11. Add Parallel Branches in Flows:
Flows will run from top to bottom and by default will run in sequence.
But you can build flows with branches of action that run in parallel when those actions are not dependent on each other. This can greatly decrease the run time of your flows.
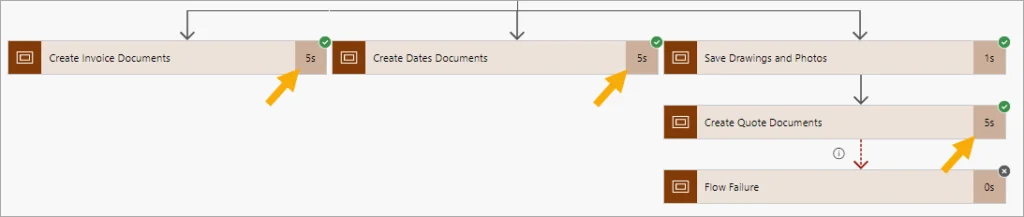
You can see three branches above. Each has an action that takes 5 seconds to run. If these were sequential it would add 15 seconds to the flow run time, but since they are running in parallel it will only add 5 seconds in total to the run time.
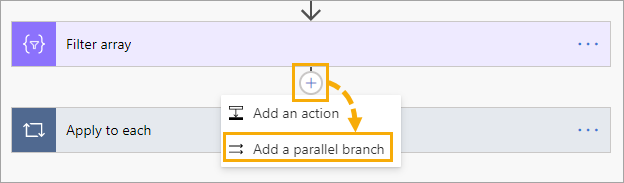
To add a parallel branch, click the plus icon between two actions then select the Add a parallel branch option. This will add the branch and let you select an action to add to the empty part of the branch.
12. Apply to Each Concurrency Setting:
The apply to each action allows you to perform actions for each item in an array. By default, this is done sequentially for the items in your array.
You can speed this run time up quite significantly by running these actions concurrently.
Click on the three dots in your Apply to each action and then select Settings from the options.
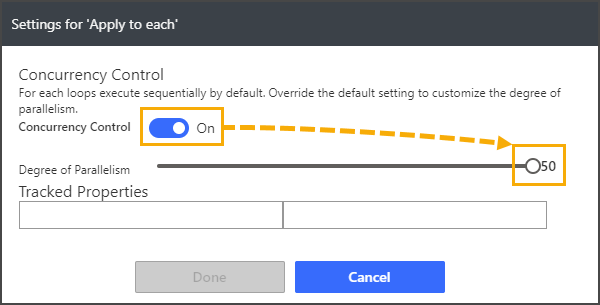
Click on the toggle to turn On the Concurrency Control and then set the slider to set the Degree of Parallelism you want.
The Degree of Parallelism means how many steps will run at the same time. You can set this to a maximum of 50 runs. You might not be able to always crank this up to the maximum of 50 because of underlying API limits of the actions inside your Apply to each step.
If your flow logic requires items to be processed in order, then enabling concurrency might not be feasible.
13. Peek Code:
There is an option that will allow you to see the code behind the action.
Some inputs will use a friendly name in the UI so Peek Code can be quite handy when you want to see what value an input is actually using behind the scene.
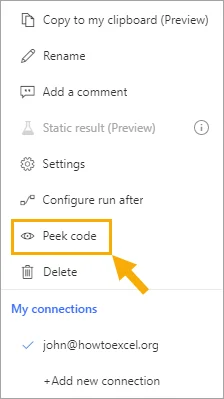
Click on the three dots in the action and select the Peek Code option.
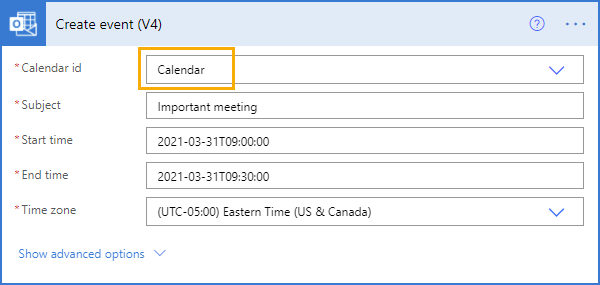
Here you can see an input labeled Calendar id and there is a friendly name for the input choices.
If you try and use this friendly input via some dynamic content or expression the action will fail because this is not actually the id used behind the scene.

Using the Peek Code option you can see the real id is a long text string.
14. Use the ? Character to Reference Items in an Object:
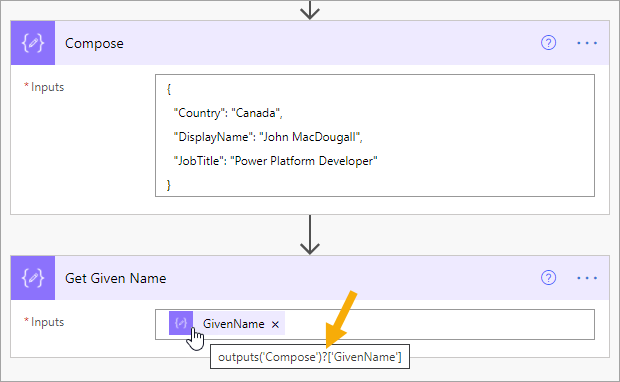
You might have noticed that sometimes there are question mark characters in expressions. What does it do?
In this example, the GivenName does not exist in the object it is referencing. Adding the question mark character (?) to the reference will ensure the Get Given Name action does not fail and instead returns a null value.
15. Add Error Handling with Configure Run After:
Actions will fail occasionally for a variety of reasons; this is a fact that you need to account for in your flow design. Fortunately, there are options to define what happens after an action fails.
For the action you want to configure click on the three dots and select the Configure run after option.
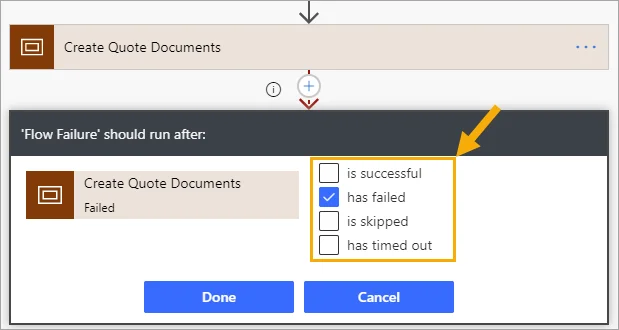
This will then let you pick one or more options for when the action should run.
- Run the action when the previous action is successful.
- Run the action when the previous action has failed.
- Run the action when the previous action is skipped.
- Run the action when the previous action has timed out.
In this example, the action is set to run when the Create Quote Documents action fails and will not be executed otherwise. Here the actions are Scopes which is a great way to define when groups of actions will run.
If any action inside the Create Quote Documents Scope fails, then the entire Scope is considered to have failed and all actions inside the Flow Failure Scope will run.
16. Using Scopes to Organize Complex Flows:

Scopes in Microsoft Power Automate are powerful containers that allow you to organize and manage complex flows more effectively. Let’s explore how you can use scopes to enhance your flow development:
Region Statement: Organizing Your Flows:
- Scopes act as regions within your flow, allowing you to group related actions together.
- By collapsing and expanding scopes, you can navigate through your flow more efficiently.
- Think of scopes as similar to code regions in programming languages (e.g., C# regions).
- When flows become large and intricate, scopes help maintain readability and focus.
How to Use Scopes:
- To create a scope:
- Open your flow in edit mode.
- Click the plus icon to add an action.
- Select Control and then choose the Scope control.
- Drag and drop the relevant actions into the scope.
- You can collapse or expand the scope by clicking on its title.
- This minimizes the size of your working area, allowing you to focus on specific sections of the flow.
- To create a scope:
Naming Conventions:
- Give your scopes meaningful names that describe the behavior of the actions inside.
- For example, if your scope handles token retrieval, name it something like “GetToken.”
- Clear naming conventions improve flow readability.
Try-Catch-Finally: Advanced Error Handling:
- Scopes also enable advanced error handling using the Try-Catch-Finally pattern.
- When designing business processes, consider what happens when things go wrong.
- Within a scope, you can handle exceptions, retries, or other error scenarios.
- This ensures robust and reliable flows.
Benefits of Scopes:
- Hide Sections: Collapse sections of the flow you’re not actively working on.
- Clean Workspace: Minimize clutter and focus on relevant actions.
- Improved Collaboration: When sharing flows, well-organized scopes benefit other developers.
Remember to leverage scopes wisely to enhance flow organization and maintainability!
17. Copy and past actions:
copying and pasting actions is a handy feature that allows you to reuse existing actions within your flows. Let’s explore how to do it:
Copying an Action:
- Open your flow in Power Automate.
- Locate the action you want to copy.
- Click on the ellipsis icon (three dots) next to that action.
- Select “Copy to Clipboard” from the menu.
- Power Automate will store the action in memory.
Pasting the Copied Action:
- To paste the copied action:
- Add a new action by clicking the “+” icon or selecting “New step”.
- Choose the type of action you want to add (e.g., create an item, send an email, etc.).
- In the action configuration, select the “My Clipboard” tab.
- You’ll see your copied action waiting there, ready to be used.
- Simply select it to add it to your flow.
- To paste the copied action:
Benefits and Considerations:
- Reuse: Copying and pasting actions saves time by reusing existing configurations.
- JSON Version: When you copy an action, Power Automate also stores a JSON version of that action as text. You can use this for documentation or sharing with others.
- Be Mindful: Keep in mind that when copying actions across flows, data dependencies (such as dynamic content) may need to be set up correctly for pasting actions to work seamlessly.

Let’s dive into the concept of connectors in Microsoft Power Automate and explore their benefits:
What are Connectors?:
- Connectors are pre-built integrations that allow Power Automate to interact with various external services, applications, and data sources.
- They act as bridges, enabling seamless communication between Power Automate and other platforms.
Types of Connectors:
- Standard Connectors: These are built-in connectors provided by Microsoft. They cover a wide range of services such as Office 365, SharePoint, OneDrive, SQL Server, and more.
- Premium Connectors: These connectors offer additional features and capabilities beyond the standard ones. They often require specific licensing.
- Custom Connectors: You can create your own connectors to connect to custom APIs, web services, or internal systems.
Benefits of Using Connectors:
- Efficiency: Connectors save time by eliminating the need to write custom code for each integration.
- Broad Coverage: Hundreds of connectors cover popular services, databases, cloud platforms, and APIs.
- Consistency: Connectors follow best practices and ensure consistent interactions with external systems.
- Security: Connectors handle authentication and security protocols, keeping your data safe.
- Scalability: Easily scale your automations by leveraging existing connectors.
- Community Contributions: Many connectors are community-contributed, expanding the ecosystem.
Using Connectors:
- To use a connector:
- Sign in to Power Automate.
- Create a new flow.
- Add an action or trigger.
- Search for the desired connector (e.g., “SharePoint,” “Outlook,” “SQL Server,” etc.).
- Configure the connector by providing necessary details (e.g., credentials, parameters, etc.).
- To use a connector:
Custom Connectors:
- If the built-in connectors don’t cover your specific needs, consider creating a custom connector.
- Custom connectors allow you to connect to proprietary systems, legacy applications, or APIs unique to your organization.
Remember, connectors empower you to automate tasks across different platforms, making Power Automate a versatile and powerful tool!
19. Compose VS Variables:
Let’s explore the Compose action and Variables in Microsoft Power Automate, along with their benefits and best practices:
Compose Action:
The Compose action is like the Swiss Army knife of Power Automate. It’s extremely useful when you need to perform operations on your data, store values, or use it for debugging. Here’s what you need to know:
Data Processing:
- You can go crazy with expressions inside a Compose action.
- Since it enables input, you can perform data processing inside the Compose and further in your flow.
- For example, you can convert a relative URL to an absolute URL using an expression like:
replace(<relative URL>, 'href=''/','[1](https://manueltgomes.com)'). - The Compose action will return a string with the correct URL that you can use in subsequent actions.
Data Validation:
- Suppose you have an input, and you want to check if it fits in a destination field.
- Use a Compose action to get the field’s length and then use it for validation.
- For instance, calculate the length of the provided characters:
length(<input>). - Having this pre-calculated value allows you to use it in multiple places and improves performance compared to using a variable.
Debugging:
- Debugging flows can be challenging, but the Compose action helps a lot.
- Use it for data processing because in the “Run history,” you can see both the input and the output before using the value.
- This helps you identify issues in your expressions and fix them.
- Unlike using it inside a “Condition” action, where you only get a “true” or “false,” the Compose action provides more context for debugging.
Why Not Variables?:
- Variables serve their purpose, but Compose actions have advantages:
- Nesting Level: Compose actions work at any nesting level, while variables have limitations.
- Parse Data: Compose actions are excellent for parsing data.
- Dynamic Usage: Compose actions allow dynamic expressions, making them versatile.
- Variables serve their purpose, but Compose actions have advantages:
Variables:
Use Cases for Variables:
- Variables are good for storing data and performing actions like incrementing integer values.
- They are useful for scenarios where you need to store and reuse values across multiple steps in your flow.
Best Practices for Variables:
- Understand the Difference: Compose and variables serve different purposes.
- Data Validation: Use variables to store pre-calculated values for validation or other purposes.
- Debugging: For debugging, Compose actions provide more context than variables.
- Avoid Overuse: Don’t create too many variables; use them judiciously.
- Performance: Compose actions are faster than variables for quick calculations.
Remember, both Compose actions and variables have their place, and choosing the right one depends on your specific use case!
20. Hover to See Underlying Expressions:

21. Paste Expressions with @ Symbol:
The @ symbol is used in Power Automate to denote an expression.
convertFromUtc(utcNow(),'Eastern Standard Time','yyyy-MM-dd HH:mm:ss')
The above expression will evaluate to the current date and time in EST, but if you try to copy and paste this into an action input it will just get input as text and the expression won’t evaluate at run time.
@{convertFromUtc(utcNow(),'Eastern Standard Time','yyyy-MM-dd HH:mm:ss')}
If you precede the same expression with the @ symbol and encase it in curly braces like above, then you’ll be able to copy and paste it as an expression into an action’s input.
22. Generate a URL for the Current Flow Run:
While there isn’t an out-of-the-box dynamic content option for linking to the current flow run, you can construct one using the workflow() expression. The provided expression generates a URL that directly links to the current flow run.
This approach is particularly useful for error handling notifications. By including a direct link to the failed flow, troubleshooting becomes more efficient and streamlined.
Remember to incorporate this technique into your error handling processes to enhance visibility and facilitate quicker resolution.
@{ concat( 'https://us.flow.microsoft.com/manage/environments/', workflow()['tags']['environmentName'], '/flows/', workflow()['name'], '/runs/', workflow()['run']['name'] ) }
23. Copy and Past Dynamic Content or Expression Blocks:
When working with dynamic content or expressions in Power Automate, you can easily copy and paste them into other action inputs or text editors. Follow these steps:
- Select the Content Block:
- Click on the dynamic content or expression block you want to copy.
- It will partially highlight in blue.
- Copy to Clipboard:
- Press Ctrl + C to copy the selected content to your clipboard.
- Paste into Another Action:
- Navigate to the target action input or text editor.
- Press Ctrl + V to paste the copied content.
24. Sharing Power Automate Flows:
Sharing Power Automate flows with others is essential for collaboration and maximizing the benefits of automation.
Add Co-Owners:
- Benefit: Co-owners can view, edit, and manage the flow.
- Best Practice: Add team members or colleagues as co-owners to collaborate effectively.
- How: In Power Automate, select your flow, click the vertical ellipsis (⋮), and choose “Share.” Enter their names or email addresses.
Run-Only Privileges:
- Benefit: Allows users to run the flow without editing it.
- Best Practice: Share flows with run-only privileges for users who need to execute the automation but don’t require editing rights.
- How: When sharing, select the appropriate permissions level.
Distribute Links:
- Benefit: Simplifies access for users.
- Best Practice: Share the flow’s URL directly with team members or embed it in documentation.
- How: Copy the flow’s URL from the browser address bar.
Share with SharePoint Lists:
- Benefit: Automatically grants edit access to list users.
- Best Practice: Add SharePoint lists as co-owners to ensure everyone with list edit access can also edit the flow.
- How: Share the flow and add the SharePoint list as a co-owner.
Guest User Sharing:
- Benefit: Enables external collaborators to participate.
- Best Practice: Share flows with guest users (external collaborators) by adding their email addresses.
- How: Use the “Share” option and include guest user emails.
Benefits of Sharing Flows:
Collaboration:
- Shared flows foster teamwork and allow multiple contributors to work on the same automation.
- Collaboration leads to better solutions and faster development.
Efficiency:
- Shared flows reduce duplication of effort.
- Team members can reuse existing flows, saving time and resources.
Visibility and Transparency:
- Sharing flows provides visibility into automation processes.
- Team members can understand and contribute to the organization’s workflows.
Scalability:
- Shared flows can be scaled across departments, projects, or the entire organization.
- Automation becomes an enterprise-wide initiative.
Error Handling and Troubleshooting:
- Shared flows allow team members to troubleshoot issues collectively.
- Error notifications can be sent to relevant stakeholders.
25. Continuous Testing: Ensuring Flow Accuracy:
Testing is a critical aspect of flow development. Regular and thorough testing ensures that your flow operates correctly and reliably. Consider the following best practices:
Scenario Testing:
- Test your flow with various scenarios, including both expected and edge cases.
- Verify that it handles different inputs, conditions, and exceptions gracefully.
Data Validation:
- Validate data at each step of your flow.
- Confirm that data transformations, calculations, and actions produce the desired results.
Error Handling:
- Test error-handling mechanisms.
- Ensure that your flow responds appropriately to errors, retries, and exceptions.
End-to-End Testing:
- Run end-to-end tests to simulate real-world usage.
- Check if the flow integrates seamlessly with other systems and services.
Automation Suites:
- Consider creating automated test suites.
- These suites can be run periodically or triggered by specific events.


Comments
Post a Comment